- Overview of Seesaw - get a quick view of all the features of Seesaw and where things are at!
Showing posts with label Assessment. Show all posts
Showing posts with label Assessment. Show all posts
Monday, June 1, 2020
Using Seesaw
In this post, I will share tutorials on how to use Seesaw...
Friday, April 17, 2020
Presenting Recorded, Live, or Interactive Lessons
There are so many ways to provide lessons to students. With the attached document, I will share some resources you can use for providing instruction students and the possible features you have to use with them. Click here for a list of suggested resources! There are many out there, but I tried to use resources available in my district, resources that were free (or had enough free features to still be used after trial periods, and resources that any content created could be reused when school resumes). If you have a suggestion, please let me know and I may add it to the list! This post also assumes that you are using Screencastify, Google Meet, or Zoom to record your lesson and Zoom (or Google Meet if allowed by your district) to present the live lesson.
Key Features of the Chart
Type of Lesson - What type of setting can this resource be used for?
Student Interaction - What are the different ways that students can respond or interact with the lesson.
Game Features - Can you create games for students to play either during the lesson or on their own time.
Assessment Tools - Are you able to collect data, score, or provide feedback to students?
Homework / Missed Class Options - Can students interact / complete activities just like during a live session.
Google Classroom Integration - Can you assign activities with Google Classroom?
Initial Setup - How challenging is it to setup this resource for teachers and students?
Key Features of the Chart
Type of Lesson - What type of setting can this resource be used for?
- Recorded - Good for teaching content - students watch.
- Live - Good for teaching or demonstrating content - students watch, question, and discuss
- Interactive - Students participate / interact through out the lesson - students watch, question, discuss, and interact with content.
Student Interaction - What are the different ways that students can respond or interact with the lesson.
Game Features - Can you create games for students to play either during the lesson or on their own time.
Assessment Tools - Are you able to collect data, score, or provide feedback to students?
Homework / Missed Class Options - Can students interact / complete activities just like during a live session.
Google Classroom Integration - Can you assign activities with Google Classroom?
Initial Setup - How challenging is it to setup this resource for teachers and students?
Saturday, January 18, 2020
Going Paperless (for Teachers) with Kami
Here are the steps I recently went over with teachers during our workshop in getting ready to use Kami. These steps are to help you put in place a system that replaces using paper and pencil for many teacher tasks. This is how I manage using Kami with Google Drive; however, there are a couple different ways that you can use Kami and organize your files.
Step 1 - Log in to the Chrome Browser using your school account information.
Step 3 - Go to https://www.kamiapp.com/ and create an account.
Step 1 - Log in to the Chrome Browser using your school account information.
- If you have assessments that you would like to use with Kami, make sure they are uploaded to your Google Drive or if a folder has been shared with you, make sure you add it to your 'My Drive."
Step 2 - Add a folder to your bookmarks bar.
- Learn how to show your bookmarks bar, add folders to it, and add websites to those folders.
- Don't forget to bookmark Kami!
- This is not neccessary, but will be a big help organizationally if you are toggling between a desktop and an iPad or other device.
- Click here to see how to add the Booksmark bar to your screen across different platforms.
Step 3 - Go to https://www.kamiapp.com/ and create an account.
- Verify in the settings that you are automatically synced with Google Drive and that you 'install' the Chrome extension to your Chrome browser.
Step 4 - Open a file through Kami's website and bookmarking it.
- Here you will learn an organizational trick when it comes to using Kami for Assessment or other teacher purposes.
Step 5 - Opening a file and using Kami to annotate on an assessment or other document.
- Here you will learn what to do when you are assessing a student or using Kami with some other document.
Step 6 - Using Kami with an assessment that is given multiple times a year. (Using the 'Make a Copy' Feature)
- Here you will learn a trick for those assessments that you give to all your students multiple times a year.
Step 7 - Organizing your files in Google Drive.
- Here you will learn how to organize your files to make it easier to manage all the documents you will be creating.
Tips and Tricks - How to Create Your Own Checklists / Notetaking Tools to use with Kami.
How to Log into Chrome Browser
Logging into Chrome Browser is very helpful when working with sites that support Google Login. If you are logged in to your Chrome Browser, when you visit a site that supports Google Login you will click the Google Sign-in button the first time and then be automatically signed in on your return visit. Signing into your browser also helps sync your bookmarks across devices, which is really helpful when you work across two or more devices. Here are the steps to follow....
For a desktop / laptop...
For a desktop / laptop...
- Open Chrome Browser.
- Click on the 'People' button (to the left of the three dots).
- Click 'Sign in to Chrome.'
- Enter your username and password.
- Then, sign in. Once you have done this, it will save your information for you. You will not have to sign in each time you open the browser. (If your organization has strict password requirements, you may need to periodically enter your password to verify that you are who you say you are).
- If you are using multiple devices and want to synce your bookmarks - make sure that you select 'turn sync on.'
For an iPad...
- Open Chrome Browser.
- Click on the three dots in the top right corner.
- Click 'Settings.'
- Enter your username and password.
- Then, sign in. Once you have done this, it will save your information for you. You will not have to sign in each time you open the browser. (If your organization has strict password requirements, you may need to periodically enter your password to verify that you are who you say you are).
- If you are using multiple devices and want to synce your bookmarks - make sure that you select 'turn sync on.'
It's a good idea to be aware of what it means to sync your information. See this post about the difference between signing in to Google, signing in to the Chrome Browser, and what it means to sync data across devices.
Sunday, March 17, 2019
Tips and Tricks with Kami
Here are some tips and tricks for using Kami in your classroom...
Taking Notes
File Management Tips
Taking Notes
- Use the grayed areas on the side to scroll up and down.
- Click on the gray area after selecting a new tool to move the toolbar out of the way.
File Management Tips
- Creating 'Copies' of an Assessment
- From Kami, access the assessment from Google Drive.
- Once open, click on the OPEN FILE icon (top right).
- Click on VIEW ALL (at the bottom of the menu).
- Click CREATE A NEW COPY. (It will create a copy in your Kami Uploads Folder).
- At the top of the screen, click on the crazy file name and change it to what you like.
- The file is initially saved in the Kami Uploads folder. You can go into Google Drive and drag it into whatever folder you like!
- ****This is great for Concepts of Print, Letter ID, F&P Summary Forms, Sight Words, Conferring Notes, Lesson Plans, etc because you can easily toggle between files. Just follow steps 1-3. Then instead of creating a new copy, click on the file you would like!****
- F&P's
- File Name - List the Date, Level, F/NF, Instruction/Indepedent, Student Name. It will order your files chronologically in Drive for you :).
- Finding Files in Google Drive from Kami - Click NAME to sort files ABC, click LAST MODIFIED to sort files newest to oldest.
Tuesday, August 9, 2016
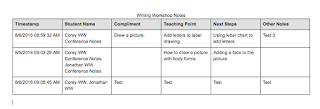
docAppender Google Forms Add-On
docAppender works with Google Forms. It takes what is put into a Google Form into a Google Doc for you. This is great if you would like to use Google forms to take notes while working with students or parents. The information is exported to a Google Doc based on your preference - vertical table, horizontal table, or bulleted list. For example, if you are taking notes in a Google Form about a writing conference with a student, the information will be collected in a Google Doc specific to that student for you. This is great if you want to go paperless or have access to your notes anywhere anytime without dragging a binder around.


Ways to use docAppender:
- Note taking on student's skills, academic progress, or behaviors.
- Note taking on parent / teacher communication.
- Quiz / Test Taking / Quick Checks for students to take and teacher grades in Google Doc.
- Feedback / Survey
Subscribe to:
Posts (Atom)