- How to log into a School Chromebook
- Creating seperate accounts in Google Chrome (so data from a personal account isn't synced with a student account
- Using Clever to log-in to multiple sites (your district must have access to this)
- Google Classroom Tutorial for Parents
- And more....
Showing posts with label Google. Show all posts
Showing posts with label Google. Show all posts
Friday, March 27, 2020
Parent Tech Tutorials
Visit my Parent Tech Tutorials playlist on YouTube for videos you can share with parents. You can find posts on these topics (and more)....

Wednesday, March 25, 2020
Creating Interactive Lessons Using Google Slides
Here's some YouTube tutorials for creating interactive lessons using Google Slides...
- How to Create Drag and Drop Activities with Google Slides by ShakeUpLearning - Apple Tree Activity
- Using Google Slides to Makea. Drag & Drop Activity by Michelle Austin - Math Number Sort Activity
Sunday, March 22, 2020
Additional Tech Posts
Here's some additional tech posts shared by the Librarians in my district...
Google Apps (Docs, Slides, etc) training https://teachercenter.withgoogle.com/training
Distance Learning training from Google https://edu.google.com/latest-news/covid-19-support-resources/?modal_active=none&topic=distance-learning-training
Getting Started with Google https://teachercenter.withgoogle.com/resources/general?tags=gettingstarted
Special needs accessibility https://teachercenter.withgoogle.com/resources/general?tags=specialneeds
Friday, March 20, 2020
Implementing School and District Wide Google Classroom Idea
A couple teachers and I brainstormed these ideas for implementing Google Classroom building wide. We have also discussed the desire to share activities district wide. Google Classroom allows teachers to create an activity in one class, then reuse it in another class. Every teacher who has access to a class can then reuse that post in another class.
- All Special Areas
- All Special Areas are added to all classes.
- All Special Areas can create their own Google Classroom and created all their lessons and materials in that class (with no students).
- When they want to forward an activity to a class (maybe the day they had their original special), they would go into their lesson and check the box next to the class they want to send it OR go into the teacher's class, select 'reuse post' and add it to the teacher's class.
- All Special Ed, Speech, Pscycologists, and Support Staff
- All Special Ed, Speech, and Support Staff can be added to all classes they have students in.
- All support staff can create their own Google Classroom and create all their lessons and materials in that class (with no students).
- When they want to assign an activity for a specific student - they go into that student's class > select 'reuse post' > and check that student's name.
- Only that student will get that assignment - no one else will see it in the class.
- By following this model - parents and students would not be able to see who else gets services. They would only see that their child is part of a whole class.
- In addition, if a Support Teacher creates a student sensitive activity within their own class first, it prevents them from accidently sharing it with a whole class (there's no students in their own class).
- All Reading / Math Specialists
- All Reading / Math support can be added to all classes.
- They can share resources to a Building or District Group that other teachers can pull from
- If specialists want to work with their students, they can do the same as Special Ed, Speech, and Support Staff
- They can create all their lessons and activities in one class. (no students)
- They can go into the student's class, select 'reuse post' and assign it to the students they work with.
- All Classroom Teachers
- Have their own classroom where they create their activities.
- Classroom teachers can also be members of a district wide grade level Google Classroom. They would select their class and the district group when creating the activity. Then any teacher would be able to take the activity from the original post and add it to their own class.
By following this model, there are other benefits....
- All classroom teachers would be aware of what activities their students are receiving from support and special areas. (They would see the workload that their student is receiving).
- All support and special areas would see what work teachers are sending out and be able to better support the student.
- Teachers can organize their own Google Classroom Activities in which ever way works best for them.
- It would be alot having a Classroom Teacher and Support teacher creating and saving drafts in the same space while interacting with students.
- Parents would not be overwhelmed with seeing possibly 5+ groups (Classroom, Art, Music, Library, Gym, SPED, Speech, Reading Support, Math Support, OT/PT).
- It makes it easier to see what work their child has to do (it's all in one place).
- Everyone with each group could see that Google Calendar (if they are scheduling meetings or check-ins) as well.
- Also, if you created building or district level Google Classrooms, there would be a common Google Drive folder that teachers could add resources too and they would have a place to collaborate and share ideas (on the activity wall).
- Also everyone gets to muddle through using Google Classroom with no students to worry about seeing posts and mistakes :).
Wednesday, March 18, 2020
Google Meet (Video Conferencing)
Google Meet is another great resource for being able to have a live class, small group, or 1:1 tutoring session with students. (You can use Google Meet to show the lesson, but use other platforms like Google Classroom, Classflow, Seesaw, etc to distribute materials). You have the ability to share your computer screen with your students, but . You may also just use it to record a lesson for you to then send to students at a later time. You can also chat with particpants as well.
Setting up a meeting is very easy. Go to https://meet.google.com/. You may sign in with your Google information. (if you are already logged into your device, you will be automatically logged in). Click 'Join or Start a Meeting.' You will be prompted to create a name for the meeting. Once the meeting is created, you can share the meeting with students by looking up their names, sharing a link, or scheduling it through the Calendar. The interface for Google Meets is simplified.
Google Meets allows you to record the session and automatically downloads the meeting to your Google Drive. You will receive an email once it's available in your Google Drive. Please make sure you keep the security settings locked down! When setting up a video conference, you do not have the option to mute or block participants Video Feed. (You can mute someone, but then they can unmute themselves). Just a reminder about confidentialty here! Students can not be taped or video taped without parental consent! I have a Google Form that I am going to create and have parents fill out ahead of time (just in case).
Some other tips if you choose to do a video conference...
Setting up a meeting is very easy. Go to https://meet.google.com/. You may sign in with your Google information. (if you are already logged into your device, you will be automatically logged in). Click 'Join or Start a Meeting.' You will be prompted to create a name for the meeting. Once the meeting is created, you can share the meeting with students by looking up their names, sharing a link, or scheduling it through the Calendar. The interface for Google Meets is simplified.
Google Meets allows you to record the session and automatically downloads the meeting to your Google Drive. You will receive an email once it's available in your Google Drive. Please make sure you keep the security settings locked down! When setting up a video conference, you do not have the option to mute or block participants Video Feed. (You can mute someone, but then they can unmute themselves). Just a reminder about confidentialty here! Students can not be taped or video taped without parental consent! I have a Google Form that I am going to create and have parents fill out ahead of time (just in case).
Some other tips if you choose to do a video conference...
- Do not have any music playing in the background (intellectual rights issues can come up if you post your video online.
- Ask students to mute their side unless they have something to share - it can be distracting if someone's sibling is crying or a dog barking in the background.
- Students and parents can see what's in the background.
- Make sure everyone in the area is aware that you are recording, students are watching, and students are listening.
- Keep in mind, if you are sharing your whole screen, your students/parents will see what ever is on your computer screen. If you select to share only a particular window, then they won't see other content that's on your computer.
- ****When you leave the meeting, your students can stay and chat! Make sure everyone has left the meeting before you leave!****
- **You must click on 'record' to record a session and you must click it at the end to stop the recording.**
Setting Up Google Classroom (Updated 3/20)
Google Classroom is a great resource for posting lessons, sharing documents, and having students complete assignments.
- Click here for a Zoom Video Conference with fellow teachers 3/18/2020.
- The first couple of minutes talks about how Zoom works.
- Learn the layout of Google Classroom.
- Learn how to create a class and add students to that class.
- Learn how to create an assignment and assign it to students.
- See how to make an interactive lesson using the assignment feature and Google Draw.
Here's some other helpful resources...
- Here's the District's Resources for Google Classroom!
- Click here for Google Classroom's Support page.
- The NEW Google Classroom YouTube Video - this video shows some of the key features of Google Classroom.
- Here's another Google Classroom YouTube Video.
OTHER WEBINARS ON THE SAME TOPIC
- Support Staff Webinar - Special Education, School Pscycologists, ELL Tutors, Speech/Language, Special Areas
- General Teachers Webinar - This one goes in depth on creating a lesson and showing all the different options attaching tasks for students to complete.
Saturday, January 18, 2020
Going Paperless (for Teachers) with Kami
Here are the steps I recently went over with teachers during our workshop in getting ready to use Kami. These steps are to help you put in place a system that replaces using paper and pencil for many teacher tasks. This is how I manage using Kami with Google Drive; however, there are a couple different ways that you can use Kami and organize your files.
Step 1 - Log in to the Chrome Browser using your school account information.
Step 3 - Go to https://www.kamiapp.com/ and create an account.
Step 1 - Log in to the Chrome Browser using your school account information.
- If you have assessments that you would like to use with Kami, make sure they are uploaded to your Google Drive or if a folder has been shared with you, make sure you add it to your 'My Drive."
Step 2 - Add a folder to your bookmarks bar.
- Learn how to show your bookmarks bar, add folders to it, and add websites to those folders.
- Don't forget to bookmark Kami!
- This is not neccessary, but will be a big help organizationally if you are toggling between a desktop and an iPad or other device.
- Click here to see how to add the Booksmark bar to your screen across different platforms.
Step 3 - Go to https://www.kamiapp.com/ and create an account.
- Verify in the settings that you are automatically synced with Google Drive and that you 'install' the Chrome extension to your Chrome browser.
Step 4 - Open a file through Kami's website and bookmarking it.
- Here you will learn an organizational trick when it comes to using Kami for Assessment or other teacher purposes.
Step 5 - Opening a file and using Kami to annotate on an assessment or other document.
- Here you will learn what to do when you are assessing a student or using Kami with some other document.
Step 6 - Using Kami with an assessment that is given multiple times a year. (Using the 'Make a Copy' Feature)
- Here you will learn a trick for those assessments that you give to all your students multiple times a year.
Step 7 - Organizing your files in Google Drive.
- Here you will learn how to organize your files to make it easier to manage all the documents you will be creating.
Tips and Tricks - How to Create Your Own Checklists / Notetaking Tools to use with Kami.
How to Log into Chrome Browser
Logging into Chrome Browser is very helpful when working with sites that support Google Login. If you are logged in to your Chrome Browser, when you visit a site that supports Google Login you will click the Google Sign-in button the first time and then be automatically signed in on your return visit. Signing into your browser also helps sync your bookmarks across devices, which is really helpful when you work across two or more devices. Here are the steps to follow....
For a desktop / laptop...
For a desktop / laptop...
- Open Chrome Browser.
- Click on the 'People' button (to the left of the three dots).
- Click 'Sign in to Chrome.'
- Enter your username and password.
- Then, sign in. Once you have done this, it will save your information for you. You will not have to sign in each time you open the browser. (If your organization has strict password requirements, you may need to periodically enter your password to verify that you are who you say you are).
- If you are using multiple devices and want to synce your bookmarks - make sure that you select 'turn sync on.'
For an iPad...
- Open Chrome Browser.
- Click on the three dots in the top right corner.
- Click 'Settings.'
- Enter your username and password.
- Then, sign in. Once you have done this, it will save your information for you. You will not have to sign in each time you open the browser. (If your organization has strict password requirements, you may need to periodically enter your password to verify that you are who you say you are).
- If you are using multiple devices and want to synce your bookmarks - make sure that you select 'turn sync on.'
It's a good idea to be aware of what it means to sync your information. See this post about the difference between signing in to Google, signing in to the Chrome Browser, and what it means to sync data across devices.
Tuesday, August 9, 2016
docAppender Google Forms Add-On
docAppender works with Google Forms. It takes what is put into a Google Form into a Google Doc for you. This is great if you would like to use Google forms to take notes while working with students or parents. The information is exported to a Google Doc based on your preference - vertical table, horizontal table, or bulleted list. For example, if you are taking notes in a Google Form about a writing conference with a student, the information will be collected in a Google Doc specific to that student for you. This is great if you want to go paperless or have access to your notes anywhere anytime without dragging a binder around.

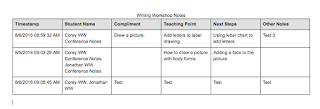


Ways to use docAppender:
- Note taking on student's skills, academic progress, or behaviors.
- Note taking on parent / teacher communication.
- Quiz / Test Taking / Quick Checks for students to take and teacher grades in Google Doc.
- Feedback / Survey
Sunday, January 3, 2016
Saving PDF from Site to Google Drive / Printing to Drive
This post is helpful if you have a large PDF file that you want to save or only a portion of a large PDF file you want to save to Google Drive. This is just like printing only certain pages of a document, but instead of printing the document out, you are saving it to your Google Drive to use again and again.
Ways to Use This Post
1. Make sure you are logged in to your Chrome account.


2. PDF's will pop-up in preview mode. Move the mouse over the document, you will see the print icon appear in the top right corner. (If what you want to print isn't in preview mode, go to FILE > PRINT).

3. A Print Preview window will open. Go to DESTINATION and click CHANGE.


Ways to Use This Post
- Save a specific unit from a larger PDF document.
- Save an activity you want to reuse each year from a larger PDF document.
- Save an article or PDF from a website (in this case, I saved the K ST Math Scope and Sequence to put in the Curriculum's Grade K Math Folder).
1. Make sure you are logged in to your Chrome account.


2. PDF's will pop-up in preview mode. Move the mouse over the document, you will see the print icon appear in the top right corner. (If what you want to print isn't in preview mode, go to FILE > PRINT).

3. A Print Preview window will open. Go to DESTINATION and click CHANGE.

4. Scroll down to the section "Google Cloud Print." Select SAVE TO GOOGLE DRIVE.

5. The destination will then say "Save to Google Drive" and will list underneath it the Google account it will send it to. Click SAVE.

6. The file will be saved in your MY DRIVE folder. To find it easily, go to RECENT. It will be the first file in the list.

7. To change the file's name and location...
- Click on the file.
- Click on the three dots OR right click on the file name.
- Select your action - CHANGE NAME or MOVE TO.

- If you move the file to a new folder, it will still appear in your RECENT folder, but it will also be in whichever folder you assigned it to.
Friday, August 21, 2015
Doing More with Google Docs (Sheets and Docs)
If you'd like to do more with Google Docs and Google Sheets, check out the free add-ons! These add-ons let you add features to your documents, new fonts, clip-art, organize information, insert graphs, live chat with collaborators, and more! I especially like the app for clipart and the app for different fonts. Here's some add-ons I found useful in Google Docs.
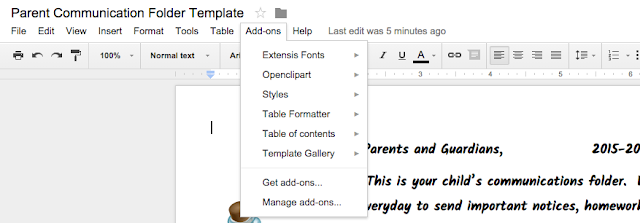
Here's a snapshot of some of the add-ons in Google Sheets.


Here's a snapshot of some of the add-ons in Google Sheets.

To find Add-ons, click on the ADD-ONs menu at the top of the document screen. Then click GET ADD-ONs. A menu of add-ons will pop-up like pictured above. Browse through the add-ons. If you like one, click on + FREE. A window will pop-up letting you know what the add-on has access to. Click ACCEPT. The app will then be added to your Add-Ons file. When you want to use it, just click on the name and the app will open on the right side of the screen.
Tuesday, April 21, 2015
Google Custom Search
Good afternoon,
Would you like to be able to have kids search for things online, but are afraid of what sites might pop-up? Try Google Custom Search. Here’s how it works…
- Click on the link: https://cse.google.com/cse/.
- Click on CREATE A CUSTOM SEARCH ENGINE.
- Visit sites that you know are safe that your kids could use to search for information. Copy and paste the URL into the boxes on the Google Custom Search page. You can add as many sites as you like.
- Give your Custom search a name, then save it.
- You can email the link to your Custom Search Engine or add a link to your webpage that goes to the browser.
- Students can then go to your Search Engine and search whatever they like (or whatever you assign them). When they type in a word and click enter, the search engine will pull up information only from the sites you listed in your search engine.
- (For example, on mine I put PBS Kids, Brainpop Jr, Starfall, Kids Nat Geo). Click this link to see the one I created for my class. I have mine posted on my Students Links page. You are welcome to use it (obviously the sites I choose might work best for K-2. We are learning all about plants and animals and students will be able to search for information on their own.
- To edit your search engine
- Click on the 9 blocks.
- Click on MORE.
- Click on EVEN MORE FROM GOOGLE.
- Scrolled down to Specialized Search. Click on Custom Search. You will then see a list of all search engines you created.
A classmate from my grad class shared this with the class. We were reading different studies about new technologies, new literacies, and new literacy skills. Some ideas from the studies…
1. Students need experience and instruction exploring digital literacy and using electronic devices.
2. Traditional comprehension skills are not enough to help readers read online texts. (Interestingly in one article, stronger readers did worse online because they didn’t have experience using web resources, while weaker students did better because they used the computer a lot for gaming and finding information at home).
If you are interested in reading the studies, let me know and I can share them with you. If you would like help with the Custom Search, let me know as well!
Saturday, February 14, 2015
Logging into Chrome Browser vs. Google Drive in any Browser (Internet Explorer, Safari, Firefox) - Security and Privacy Concerns
As Groton begins to explore more and more with what we can do with Google, there have been some concerns about privacy and security. This post is to help explain the differences between logging in to Chrome (Google's Internet Browser) and Google Drive in ANY browser and what privacy and security possibilities there are to be aware of when using Google products.
Logging in to Google with ANY Browser (Chrome, Internet Explorer, Safari, Firefox)
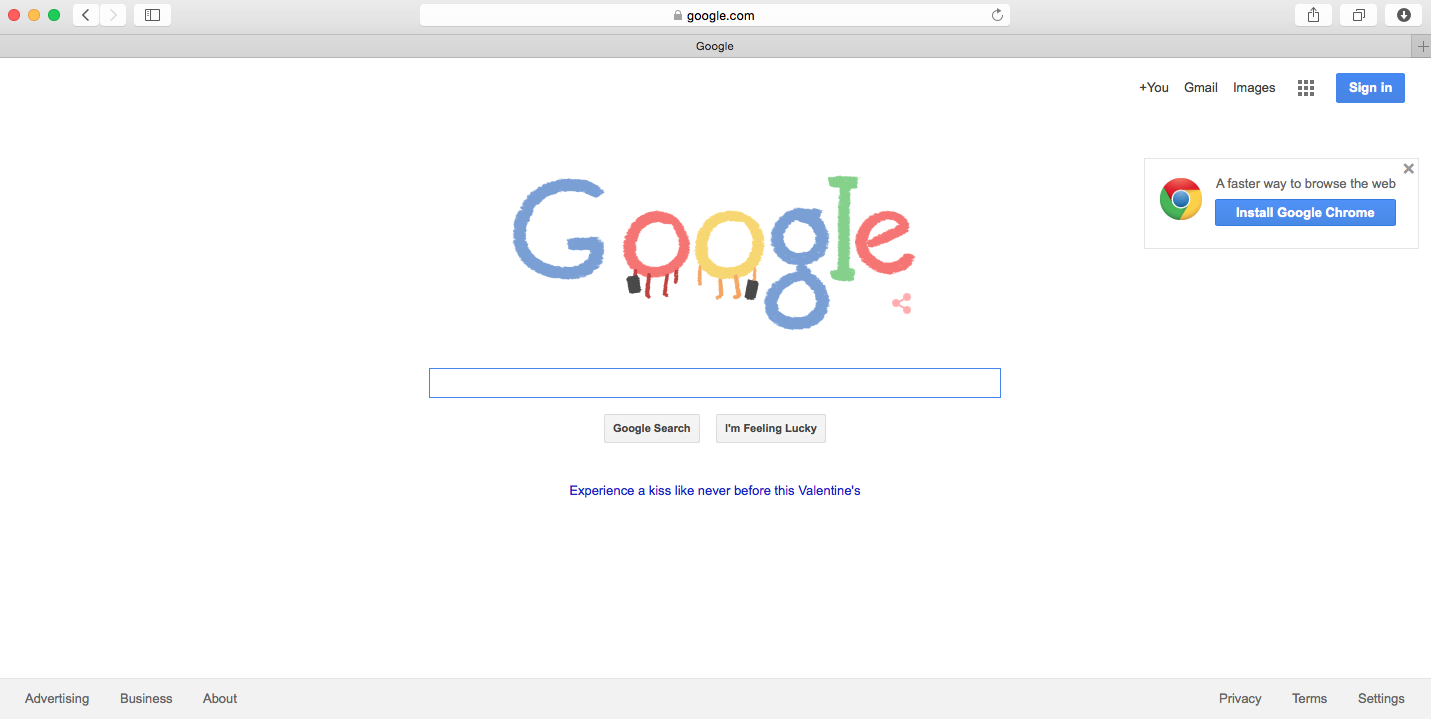


Logging in to Google with ANY Browser (Chrome, Internet Explorer, Safari, Firefox)
- Pictured below is what it looks like to log in to Google by going to www.google.com (using Safari).
- You will notice the SIGN IN area changes once I log in to my school's account. Here's how you can check if your computer is logged into Google AND/OR what account you are logged in to (if you're in your account or someone else's).
- Benefits:
- Once logged in, you will have access to all Google products (Contacts, Drive, Sites, Docs [Sheets, Slides, Docs], Blogger, etc).
- Security / Privacy Concerns
- Keep in mind these security / privacy concerns applies to your school's Google account AND (if you have it) your private Google account.
- All searches on Google (while logged into your school account) is saved by Google and viewable by Central Office as the administrator of your school's Google account.
- If you do not log out, the next person coming to your computer will have access to all of your Google Products - what's in Contacts, Drive, Sites, Docs, Blogger, etc...
- Password information can be saved in your Google history if you ask the site to remember your password.
Logging in to Google Chrome
Logged in to Chrome Browser
As with logging in to Google.com and having your information synced, Google Chrome does the same thing at the browser level. To log in to Chrome, you would have to click on SIGN IN under the file menu. You may sign in to multiple Google accounts at a time on one device.
- Benefits
- Chrome will keep track of all searches and sites you visit (which can be helpful when you're looking up resources for a lesson, but not so useful if you are doing personal activities liking banking or paying bills).
- If you bookmark a site on one device, it will be available across all devices that you log into Chrome with.
- Security / Privacy Concerns
- Again, keep in mind these security / privacy concerns applies to your school's Google account AND (if you have it) your private Google account.
- Chrome will keep track of all searches and sites you visit.
- All passwords you save will be available across all devices you log in to using Chrome.
- If you do not log out of Google Chrome, all saved information is accessible to others who have access to your device. They will also have access to ALL of your Google Products you have access to.
- CAUTION - when you log in to Chrome on a new device, it will ask if you want to sync your information - this will import your bookmarks to that device - it will overwrite the bookmarks that are already on Chrome on that device. If you don't want this, create a second account on the device.
Some Recommendations When Using Google Chrome or Drive
- Only log in to Chrome on your own computer or device.
- Do not select REMEMBER ME or the like when logging into websites that has personal information (bank accounts, credit cards, etc) if using Chrome.
- Do not do personal business (banking, shopping, Facebook) when logged in to Google.com or Chrome with your school account information. Log out, switch Google accounts, or open a different browser.
- If you are using any device that is not your's and you log in to any Google Product (Drive, Sites, Blogger, Gmail, etc) - make sure you sign out before leaving or powering down your device. (Double check by trying to access what you did - if it asks for a password, then you are logged out!).
- Password protect all your devices (iPads, tablets, smart phones, laptops, computers, etc) so that after such time, the device will lock out requiring a password to log back in. This way if its lost or stolen, no one can access your information.
- To check if you (or someone else) is logged into Google, go to www.google.com. If it says SIGN IN, no one is logged in to the device. If someone is logged into that device, their email address will appear in the top right corner.
Helpful Resources Found Online...
Subscribe to:
Posts (Atom)