- Overview of Seesaw - get a quick view of all the features of Seesaw and where things are at!
Showing posts with label Instructional. Show all posts
Showing posts with label Instructional. Show all posts
Monday, June 1, 2020
Using Seesaw
In this post, I will share tutorials on how to use Seesaw...
Wednesday, May 27, 2020
Make a Copy of a Slideshow for Each Student Without Having to Make One For Each Student!
I found this YouTube video about a trick on how to make a copy of one slideshow for each student without having to make a slideshow for each student! In theory, this will also apply to Google Docs and Google Sheets.
According to this video, you would...
According to this video, you would...
- Set the permission level of the slideshow to anyone with the link can view.
- When in the editing view, remove 'edit' from after the '/' and change it to 'copy.'
- Then, copy-paste that new link into whatever platform you are using (Schoology, Seesaw, Google Classroom, Canvas, ClassDojo, Classroom Blog/Website, etc!).
When the students access the link, it will prompt them to 'make a copy' themselves before moving forward, which will keep the original slide in it's original condition!
Tuesday, May 12, 2020
Using Google Slides with Pear Deck and Sharing It With Students
Pear Deck is a great add-on in Google Slides. It allows you to add audio directions to your Google Slide and allows student interaction with your slides. This is a great way to get feedback from students (especially at the younger grades). With Pear Deck, you can have students respond with a text answer, multiple choice, number, have them go to a specific website, draw on the slide, or drag something to answer. Students' answers are only visble to you (unless you choose to share it with the kids after a lesson or during a live lesson! In this blog post, I will show you step-by-step how to setup and use Pear Deck with your students through video tutorials....

How to Get the Pear Deck Add-on and Use It with Students
- How to get the Pear Deck add-on:
- How to open Pear Deck in Google Slides and Overview of the Menu:
- How to add audio to a Google Slide:
- How to get the link to share with students and share on different platforms:
Google Classroom Seesaw ClassDojo This can be done with Schoology, Canvas, and
any other platform. I just have experience with
Google Classroom, Seesaw, and ClassDojo. - How to see students' responses from a 'Homework Assignment': (To Be Revised):
- How to use Pear Deck during a live lesson (presenting, using the Dashboard, seeing student's answers, and sharing students' work):
How to Use the Different Pear Deck Tools
Student's responses are kept confidential. Students do not see each other's work and students are working on their own slides. They can not 'mess up' everyone else's slides.
 Students respond through a text box. | |
 Students choice from a multiple choice menu.
| |
 Students type in or use arrows to choice the number. | |
 Students work on a website while not leaving the slide. | |
 Students draw using pencil, highlighter, or a text box on the slide. | |
 Students use predetermined icons to drag onto the slide. | |
 Teacher records directions for students to listen to. |
Sunday, April 12, 2020
Using Zoom for Live Lessons

Click on the links below to see how to use Zoom to put on a live lesson!
Setting Up Zoom for the Lesson
Sharing the Link with Students
- Through Google Classroom (Using Google Calendar, Assignment, or Announcement Features).
- Through Seesaw (Using Activity or Announcement)
- Setting up a link in Clever. (Also helpful for learning how to add any link to Clever).
Running the Class
- Presenting a Live Lesson with Zoom (basic features) (link fixed 4/13 in the evening)
- Using different Screen Share Options in Zoom during a Live Lesson
Click here to visit Zoom's Support Page for more tutorial videos or step-by-step directions to read!
Tips and Tricks I have Learned (Updates from 4/14)
- It is very helpful having an aid, substitute teacher, or coteacher in on a lesson to help interact with the kids while you help trouble shoot parents having issues getting into the class.
- (In my district, kids are muted when they join in) - tell them how to unmute or turn on their video (if you want to see them right away). Explain that there may be times that you mute everyone so you can do your lesson.
- Go over the expectations - not making silly faces, shouldn't be showing off toys, listening respectfully, etc.
- Tell the students how to use the 'Gallery View' so they can see their whole class. This also helps with taking turns when speaking!
- For you - when you are on Gallery View - you can also easily mute and unmute kids! You can also mute/unmute from the participation box, but you have to do some scrolling to find people if you have alot of kids in your class.
- You can use the 'share screen' option to help see a kid's screen to help support them with their learning.
- If you schedule a meeting ahead of time, use the Google Calendar feature to schedule it to your Google Classroom calendar - then the kids will see the meeting on the to-do calendar or they will see it on the class calendar! Makes it easier for them to access the meeting!
- If you do share your desktop, the kids don't see each other on the side, only you can. They will see their peers across the top as they have done the whole meeting.
- Groton has the whiteboard feature blocked as of this post (4/13/2020).
- Don't have students go to Zoom first, post the link through Google Calendar, Google Classroom, or whatever other platform your class is using. DO NOT POST ANY INFORMATION ON AN OPEN WEBSITE!
Friday, March 27, 2020
Parent Tech Tutorials
Visit my Parent Tech Tutorials playlist on YouTube for videos you can share with parents. You can find posts on these topics (and more)....
- How to log into a School Chromebook
- Creating seperate accounts in Google Chrome (so data from a personal account isn't synced with a student account
- Using Clever to log-in to multiple sites (your district must have access to this)
- Google Classroom Tutorial for Parents
- And more....
Wednesday, March 25, 2020
Creating Interactive Lessons Using Google Slides
Here's some YouTube tutorials for creating interactive lessons using Google Slides...
- How to Create Drag and Drop Activities with Google Slides by ShakeUpLearning - Apple Tree Activity
- Using Google Slides to Makea. Drag & Drop Activity by Michelle Austin - Math Number Sort Activity
Friday, March 20, 2020
Online Platforms for Interactive Lessons
In our area, there are two major companies that provide smartboard software - Promethean (through ActivInspire) and SMARTBoard (through SMART Learning Suite). Both companies have online platforms that don't require Smartboards. The students can use any device to access the content. Promethean has a free web based app. Click here to learn about ClassFlow! SMARTBoard has opened up their SMART Learning Suite to all teachers impacted by recent school closures. Click here to learn about their SMART Learning Suite! Since everyone is working from home, you could use either platform to model lessons and send activities to students! You should consider though that if you plan to reuse your work when school starts, which platform will you have access to in your classroom? In my class, I have an Epson Projector so I could use either program! Both apps can be used on multiple devices, has polling features, has the ability to assign activities to specific students, able to create interactive lessons, plain whiteboard feature, and able to create games for your students once you put in the content.
ClassFlow - ClassFlow syncs with Google and has always been free. I found the way you create activities and lessons to be cumbersome and challenging to navigate. It has a similiar format to Google Classroom from the student side - which can be challenging for younger kids. It has a different feel then ActivInspire, so it's like learning a new platform when working with it. Activities created in ClassFlow do not sync well with ActivInspire and the same goes for when you convert your old ActivInspire Charts to ClassFlow.
SMART Learning Suite - SMART Learning Suite now has Google integration. The user interface online is the same as on the computer - so there's no learning curve creating new charts. Also, if you create charts online, you can download them at school and use them in the classroom. Their Games/Activities section was much easier to use. The interface was more kid friendly. You can also record your lesson to then share with kids at a later time! They charge per year (starting at $109 for one teacher). (Right now its free). Click here for all their features!
Implementing School and District Wide Google Classroom Idea
A couple teachers and I brainstormed these ideas for implementing Google Classroom building wide. We have also discussed the desire to share activities district wide. Google Classroom allows teachers to create an activity in one class, then reuse it in another class. Every teacher who has access to a class can then reuse that post in another class.
- All Special Areas
- All Special Areas are added to all classes.
- All Special Areas can create their own Google Classroom and created all their lessons and materials in that class (with no students).
- When they want to forward an activity to a class (maybe the day they had their original special), they would go into their lesson and check the box next to the class they want to send it OR go into the teacher's class, select 'reuse post' and add it to the teacher's class.
- All Special Ed, Speech, Pscycologists, and Support Staff
- All Special Ed, Speech, and Support Staff can be added to all classes they have students in.
- All support staff can create their own Google Classroom and create all their lessons and materials in that class (with no students).
- When they want to assign an activity for a specific student - they go into that student's class > select 'reuse post' > and check that student's name.
- Only that student will get that assignment - no one else will see it in the class.
- By following this model - parents and students would not be able to see who else gets services. They would only see that their child is part of a whole class.
- In addition, if a Support Teacher creates a student sensitive activity within their own class first, it prevents them from accidently sharing it with a whole class (there's no students in their own class).
- All Reading / Math Specialists
- All Reading / Math support can be added to all classes.
- They can share resources to a Building or District Group that other teachers can pull from
- If specialists want to work with their students, they can do the same as Special Ed, Speech, and Support Staff
- They can create all their lessons and activities in one class. (no students)
- They can go into the student's class, select 'reuse post' and assign it to the students they work with.
- All Classroom Teachers
- Have their own classroom where they create their activities.
- Classroom teachers can also be members of a district wide grade level Google Classroom. They would select their class and the district group when creating the activity. Then any teacher would be able to take the activity from the original post and add it to their own class.
By following this model, there are other benefits....
- All classroom teachers would be aware of what activities their students are receiving from support and special areas. (They would see the workload that their student is receiving).
- All support and special areas would see what work teachers are sending out and be able to better support the student.
- Teachers can organize their own Google Classroom Activities in which ever way works best for them.
- It would be alot having a Classroom Teacher and Support teacher creating and saving drafts in the same space while interacting with students.
- Parents would not be overwhelmed with seeing possibly 5+ groups (Classroom, Art, Music, Library, Gym, SPED, Speech, Reading Support, Math Support, OT/PT).
- It makes it easier to see what work their child has to do (it's all in one place).
- Everyone with each group could see that Google Calendar (if they are scheduling meetings or check-ins) as well.
- Also, if you created building or district level Google Classrooms, there would be a common Google Drive folder that teachers could add resources too and they would have a place to collaborate and share ideas (on the activity wall).
- Also everyone gets to muddle through using Google Classroom with no students to worry about seeing posts and mistakes :).
Wednesday, March 18, 2020
Google Meet (Video Conferencing)
Google Meet is another great resource for being able to have a live class, small group, or 1:1 tutoring session with students. (You can use Google Meet to show the lesson, but use other platforms like Google Classroom, Classflow, Seesaw, etc to distribute materials). You have the ability to share your computer screen with your students, but . You may also just use it to record a lesson for you to then send to students at a later time. You can also chat with particpants as well.
Setting up a meeting is very easy. Go to https://meet.google.com/. You may sign in with your Google information. (if you are already logged into your device, you will be automatically logged in). Click 'Join or Start a Meeting.' You will be prompted to create a name for the meeting. Once the meeting is created, you can share the meeting with students by looking up their names, sharing a link, or scheduling it through the Calendar. The interface for Google Meets is simplified.
Google Meets allows you to record the session and automatically downloads the meeting to your Google Drive. You will receive an email once it's available in your Google Drive. Please make sure you keep the security settings locked down! When setting up a video conference, you do not have the option to mute or block participants Video Feed. (You can mute someone, but then they can unmute themselves). Just a reminder about confidentialty here! Students can not be taped or video taped without parental consent! I have a Google Form that I am going to create and have parents fill out ahead of time (just in case).
Some other tips if you choose to do a video conference...
- Do not have any music playing in the background (intellectual rights issues can come up if you post your video online.
- Ask students to mute their side unless they have something to share - it can be distracting if someone's sibling is crying or a dog barking in the background.
- Students and parents can see what's in the background.
- Make sure everyone in the area is aware that you are recording, students are watching, and students are listening.
- Keep in mind, if you are sharing your whole screen, your students/parents will see what ever is on your computer screen. If you select to share only a particular window, then they won't see other content that's on your computer.
- ****When you leave the meeting, your students can stay and chat! Make sure everyone has left the meeting before you leave!****
- **You must click on 'record' to record a session and you must click it at the end to stop the recording.**
Kahoot
Kahoot provides a way for students to answer questions through multiple choice or true/false using any device that they have. It's a great substitute for the old ActivInspire Voters. With the COVID-19 Virus, Kahoot is allowing free access to their Pro Features for the rest of the school year. This opens up open-ended questions, puzzles, polls, and the ability to include informational slides in between questions! You may create an account using your Google information. Students do not need to create an account - they will use a code you post of your Kahoot to access it.
Tutorial: Click here for a 5 Minute Overview of Kahoot!
Teacher Access: www.getkahoot.com
Student Access: www.kahoot.it
Tutorial: Click here for a 5 Minute Overview of Kahoot!
Teacher Access: www.getkahoot.com
Student Access: www.kahoot.it
Zoom (Video Conferencing)
Zoom is a great resource for being able to have a live class, small group, or 1:1 tutoring session with students. (You can use Zoom to show the lesson, but use other platforms like Google Classroom, Classflow, Seesaw, etc to distribute materials). You have the ability to share your computer screen with your students and they are able to share their screens with you. Zoom does have a whiteboard feature as well that you can pull up anytime and annotate on during a lesson. You may also just use it to record a lesson for you to then send to students at a later time.
Setting up a meeting is fairly easy. Go to www.zoom.com. You may sign in with Google information or create a new username and password. After setting up a meeting, you can send a link to students/parents via any communication tool you use. They only need to do a small install that takes a couple seconds before being able to join a meeting. With the COVID-19 outbreak, the founder of the company has lifted restrictions on teacher accounts - allowing you to have multiple participants for more than 40 minutes!
Security is something we all must consider as teachers. Zoom allows you to record the session and downloads the video to your computer after the session is done. Included with the download is a video only file, a transcript of any chats that occured, and one other file. If you are concerned about space on your computer, transfer it to an external drive, upload it to Google Drive, or other video storage platform. Please make sure you keep the security settings locked down! When setting up a video conference, you have the option to see participants' video feeds or not. You may want to select not to see students' faces until you have an agreement with each parent that you have permission to video conference. They can still participate, just no one can see each other (except you and what you share from your screen). Just a reminder about confidentialty here! Students can not be taped or video taped without parental consent! I have a Google Form that I am going to create and have parents fill out ahead of time (just in case).
Some other tips if you choose to do a video conference...
- Do not have any music playing in the background (intellectual rights issues can come up if you post your video online.
- Ask students to mute their side unless they have something to share - it can be distracting if someone's sibling is crying or a dog barking in the background.
- Students and parents can see what's in the background
- You can setup a virtual background to block out everything behind you that works really well.
- Make sure everyone in the area is aware that you are recording, students are watching, and students are listening.
- Keep in mind, if you are sharing your whole screen, your students/parents will see what ever is on your computer screen. If you select to share only a particular window, then they won't see other content that's on your computer.
Setting Up Google Classroom (Updated 3/20)
Google Classroom is a great resource for posting lessons, sharing documents, and having students complete assignments.
- Click here for a Zoom Video Conference with fellow teachers 3/18/2020.
- The first couple of minutes talks about how Zoom works.
- Learn the layout of Google Classroom.
- Learn how to create a class and add students to that class.
- Learn how to create an assignment and assign it to students.
- See how to make an interactive lesson using the assignment feature and Google Draw.
Here's some other helpful resources...
- Here's the District's Resources for Google Classroom!
- Click here for Google Classroom's Support page.
- The NEW Google Classroom YouTube Video - this video shows some of the key features of Google Classroom.
- Here's another Google Classroom YouTube Video.
OTHER WEBINARS ON THE SAME TOPIC
- Support Staff Webinar - Special Education, School Pscycologists, ELL Tutors, Speech/Language, Special Areas
- General Teachers Webinar - This one goes in depth on creating a lesson and showing all the different options attaching tasks for students to complete.
Saturday, January 18, 2020
How to Log into Chrome Browser
Logging into Chrome Browser is very helpful when working with sites that support Google Login. If you are logged in to your Chrome Browser, when you visit a site that supports Google Login you will click the Google Sign-in button the first time and then be automatically signed in on your return visit. Signing into your browser also helps sync your bookmarks across devices, which is really helpful when you work across two or more devices. Here are the steps to follow....
For a desktop / laptop...
For a desktop / laptop...
- Open Chrome Browser.
- Click on the 'People' button (to the left of the three dots).
- Click 'Sign in to Chrome.'
- Enter your username and password.
- Then, sign in. Once you have done this, it will save your information for you. You will not have to sign in each time you open the browser. (If your organization has strict password requirements, you may need to periodically enter your password to verify that you are who you say you are).
- If you are using multiple devices and want to synce your bookmarks - make sure that you select 'turn sync on.'
For an iPad...
- Open Chrome Browser.
- Click on the three dots in the top right corner.
- Click 'Settings.'
- Enter your username and password.
- Then, sign in. Once you have done this, it will save your information for you. You will not have to sign in each time you open the browser. (If your organization has strict password requirements, you may need to periodically enter your password to verify that you are who you say you are).
- If you are using multiple devices and want to synce your bookmarks - make sure that you select 'turn sync on.'
It's a good idea to be aware of what it means to sync your information. See this post about the difference between signing in to Google, signing in to the Chrome Browser, and what it means to sync data across devices.
Saturday, January 30, 2016
Follow the Path Board Game - Sight Words
Have a student that needs to focus on specific sight words? Download this template to create your own Follow the Path file folder game. It was made in Powerpoint. Just change the words to what you want your student to work on. Then print it out and play!


Creating Your Own Worksheets / Game Boards
I found this YouTube post that shows you how to create your own worksheets (like those on Teachers Pay Teachers. I am also using this to help make games. This is handy if you need to differentiate instruction. I am working on creating my own templates to share through the LA Blog.
Sunday, January 24, 2016
ViewPure.com
Have a YouTube video you'd like to show, but concerned about ads or students clicking on links? Copy the YouTube link from the video you would like to show. Go to ViewPure.com. Paste the link into the search bar and click PURIFY. The movie will appear on the ViewPure page without ads or side links. This is really helpful if you want students to access a movie independently.
Here's an example...
YouTube Movie: https://www.youtube.com/watch?v=rD9dwkrUf8s&index=3&list=PLnOthrFzmyrAwb093569Z8ZNOZQTf6yr8
ViewPure Version: http://viewpure.com/rD9dwkrUf8s?start=0&end=0
Here's an example...
YouTube Movie: https://www.youtube.com/watch?v=rD9dwkrUf8s&index=3&list=PLnOthrFzmyrAwb093569Z8ZNOZQTf6yr8
ViewPure Version: http://viewpure.com/rD9dwkrUf8s?start=0&end=0
Wednesday, January 20, 2016
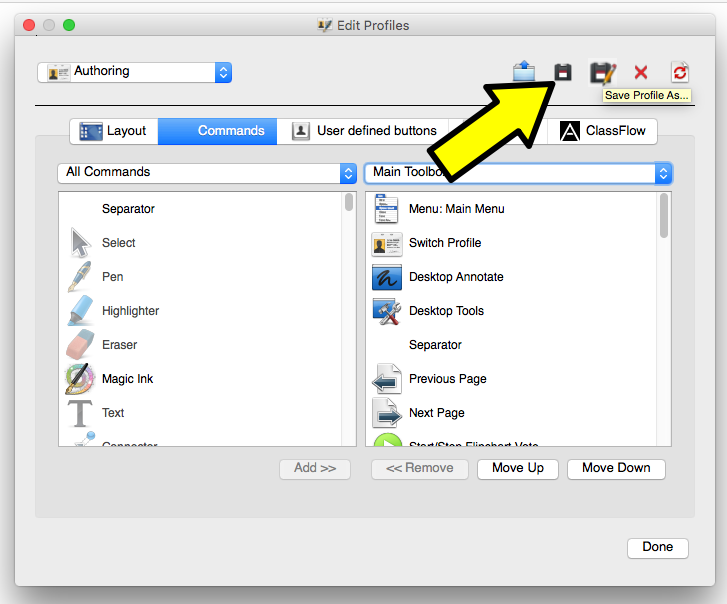
Toolbox in ActivInspire
Here's how to change the setting of your toolbox in ActivInspire. This is very handy if you want to use your interactive board or Promethean Board as a center, but don't want your students to have access to everything.
1. Click on VIEW, then CUSTOMIZE.

2. Click on the Command tab. Then add or remove what you want your students to have access to. The menu on the left is what you have to choose from, while the menu on your right is the Main Toolbar. (If you click on Main Toolbox, you may choose Marquee tools - what shows up when you click on an object in ActivInspire). Add or remove want you want in the Main Toolbox.

3. Click on SAVE AS (disk with a pencil) to save these profile settings as a new profile or SAVE if its how you want the toolbar to be for you.
- **Click here if you would like to turn page turn gestures on or off.** < useful if using the interactive board as a Center.

Turning Page Turn Gestures On / Off in ActivInspire
1. Click on VIEW, then CUSTOMIZE.
2. Click on the Settings tab. Then, Dual Mode ActivBoards.

3. Check or uncheck the box (based on your preference) next to "Enable page turn gestures."

4. Click SAVE (or Save-As if you want this profile to be a special profile with or without turn page gestures).
Ideas for Using Interactive White Boards or Promethean Boards as a Center
Your interactive board can be used for many different types of Center activities AND a good way to differentiate. Here's some ideas on how to use your Interactive White Boards as a Center...
Promethean Boards (1 User)
Promethean Boards (1 User)
- Flipchart with a student's name assigned to each page
- Easy to differentiate instruction
- Over a couple days each student would get a turn to do their page.
- Flipchart that students each get a turn to use.
- I would put a color coded star next to their name on my center chart. Each group would be divided in half so 1/2 the group would be at the board one day, then the other half the next day.
- Can differentiate by having 2-3 pages where groups are assigned to a specific page
- Interactive Website or Program - like ThinkCentral, Starfall, Pixie, Kidspiration
- Project worksheet or graphic organizer for students to annotate using Desktop Annotate through ActivInspire
Epson Projectors in Computer Mode (Using Touch for Second Student)
- Flipchart with a student's name assigned to each page
- Flipchart that students share
- 1 student on pen, 1 student on touch if the activity requires writing
- Up to 6 students could be at the board at once if they are only manipulating objects.
- Interactive Website
- Project worksheet or graphic organizer for students to annotate using Desktop Annotate through ActivInspire OR turn off Touch Input and have them write using the white board and dry erase marker. Can also use the document camera to project something for students to write on.
Epson Projectors in Projector Mode (2 students on pen, 2-6 students using finger but must agree to the tool they will use - erase or write).
- Flipchart, document, document under document camera, or website that students can annotate over but not have to manipulate the document (turning the page, scrolling up or down).
Epson Projectors with Dual Mode in ActivInspire (max - 2 students on pens, 1+ students on touch (but students using touch must agree on what tool they are using :)). **Requires a request for a driver update through SchoolDude to make Dual Mode functional on our computers.**
- Flipchart with a student's name assigned to each page
- Flipchart that students share
- 2 students on pen, 1 student on touch - all 3 can write and interact with the flipchart independently
- Up to 6 students could be at the board at once if they are only manipulating objects.
- Interactive Website (only 1 student can use a website because websites are designed for only 1 user at a time).
- Project worksheet or graphic organizer for students to annotate using Desktop Annotate through ActivInspire OR turn off Touch Input and have them write using the white board and dry erase marker. Can also use the document camera to project something for students to write on.
Work done in flipcharts can be printed out as evidence of student work for assessments or be sent home. Click here to see how to print out flipcharts.
Click here to learn how to change what buttons are available to students in the ActivInspire toolbar.
Click here to turn on/off page gestures in ActivInspire.
Some ideas for Centers...
Don't forget to check out Promethean Planet!
Language Arts
Click here to turn on/off page gestures in ActivInspire.
Some ideas for Centers...
Don't forget to check out Promethean Planet!
Language Arts
- Word Work activities - there's an alphabet chart you can use as a template available in the browser of ActivInspire or ask me (Corey) for a template.
- build words - say it, make it, write it.
- Embed sound files - record your self saying a word and students have to write it or make it with letters
- Finding letters, words, spelling patterns, syllable parts by highlighting or circling.
- Name Recognition / Get to Know You Activities - take students pictures and put them into the flipchart to match with their name or spell using the letter tiles
- Writing letters or spelling words practice
- Written response to a task
- Reading Center - poem, article, online text (like texts from Raz-Kids or Starfall).
Math
- Interactive tools - calculator, ruler, protractor, dice, timer
- Writing numbers
- Solving Math Problems
- Acting out Math problems
- Showing how to make a number in different ways
Art
- Drawing a picture to be used in a story (digital or print out)
Science
- Measurement tools - thermometer, balance, scale templates available in the Browser and on Promethean Planet
Friday, January 8, 2016
Classroom Chart for Each Student!
With TCRWP's several different charts, here's how you can make it so each student has one in their own Writing Folder!


1. Take a picture with your phone and email it to yourself.
2. On your computer, print out the email setting it to have the picture take up the whole page.
3. Put the chart in a sheet protector and add it to your students' writing folders.
***Students needed to be able to reference this chart during a lesson. We used dry erase markers to check off if we did each step when writing our stories.***
Subscribe to:
Posts (Atom)